Showing posts with label WFB. Show all posts

Thursday, January 19, 2012

Crazy "Third Party" Miniatures

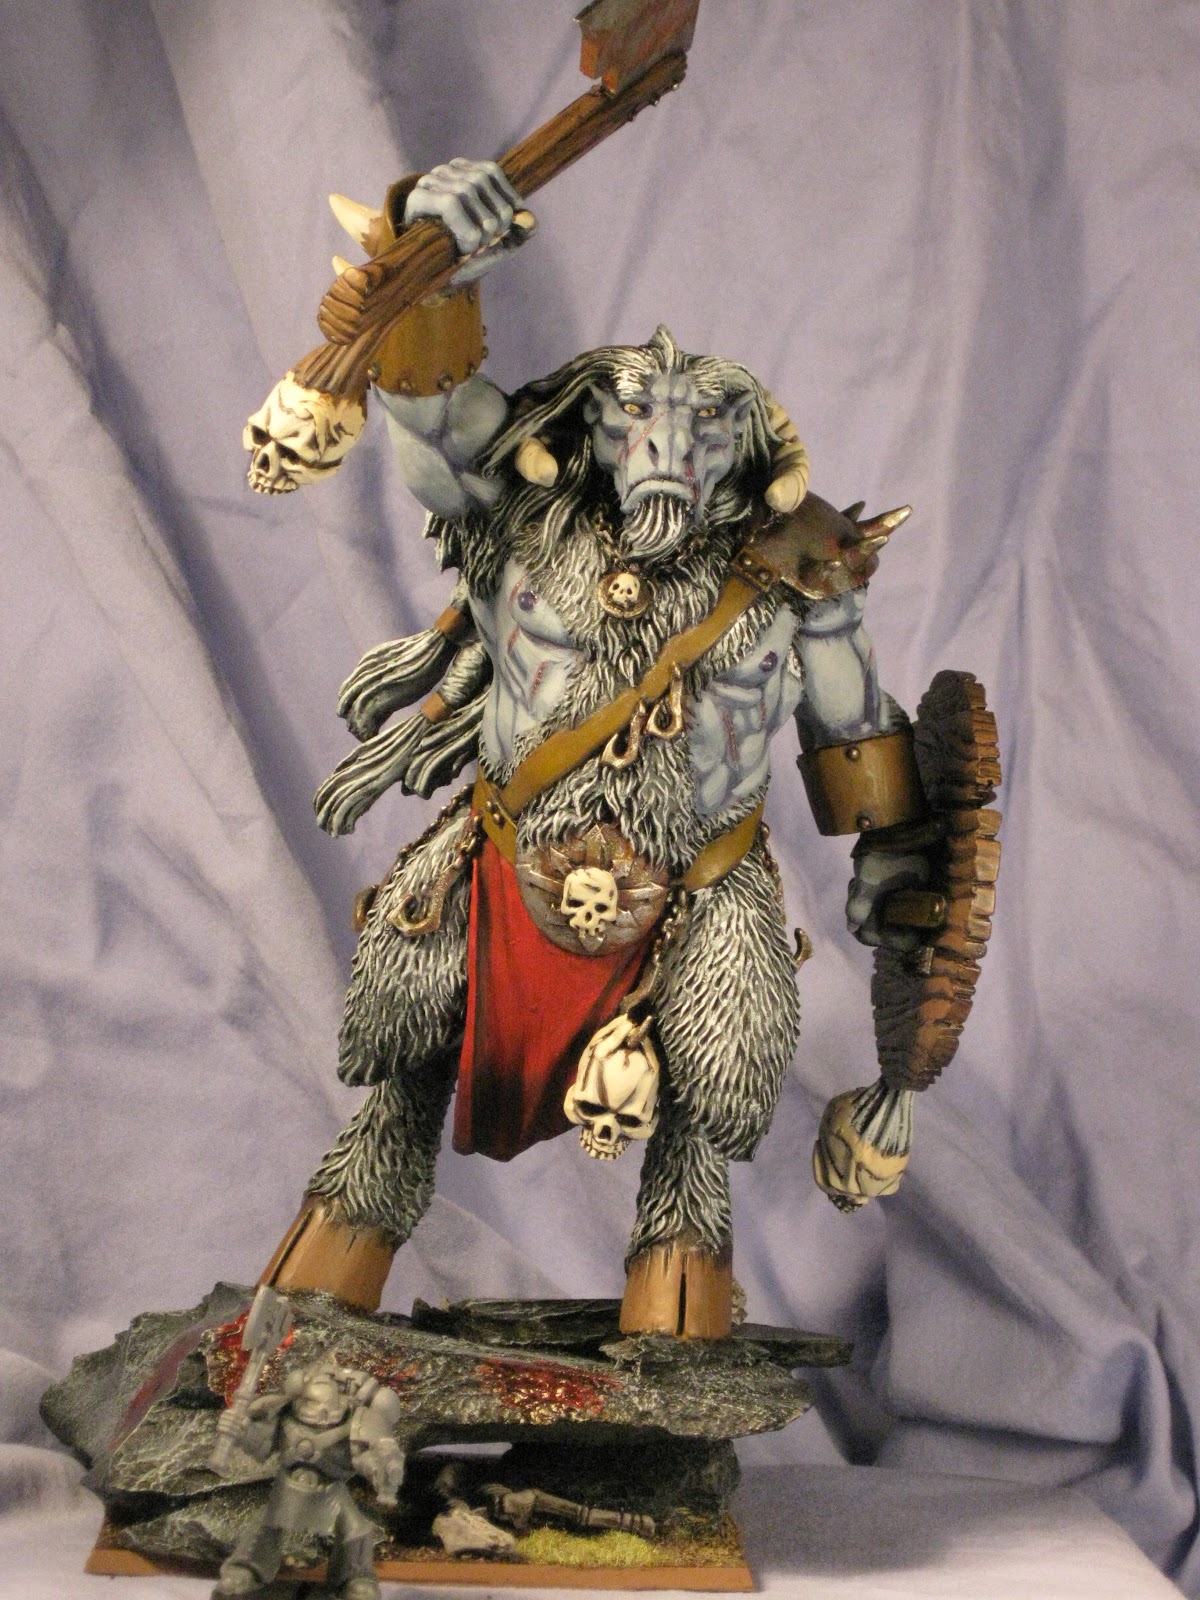
Most of my commission work comes from friends, acquaintances, and word of mouth advertising.  That said, I have a gaming buddy, a die-hard Warhammer Fantasy player who loves to use what I call "third party" minis.  These are the small start up companies that produce gaming miniatures (some of which are blatant ripoffs of the big names.  See this post for an example) that you sometimes randomly find advertised on forums or blogs.  That said, I have been working off and on for a while now on my buddy's Beastman army.  It is coming along, but he was having issues because until very, very recently, like as in a week or two ago, GW didn't have models for the units he wanted, so he bought a bunch of third party figures to fill out his ranks.  That is what this round of commission consisted mainly of.  These guys are going to be stand in gorgons and jabberslythes, I think. 

This guy strikes me as a bit too comical, but I've found that if you add enough blood splatters to something, it starts to look grim and disturbing.
I added the space marine to give you some idea of the scale of these two guys.  They are both similarly tall.
Gotta love the pig he's holding.  Pure win there.

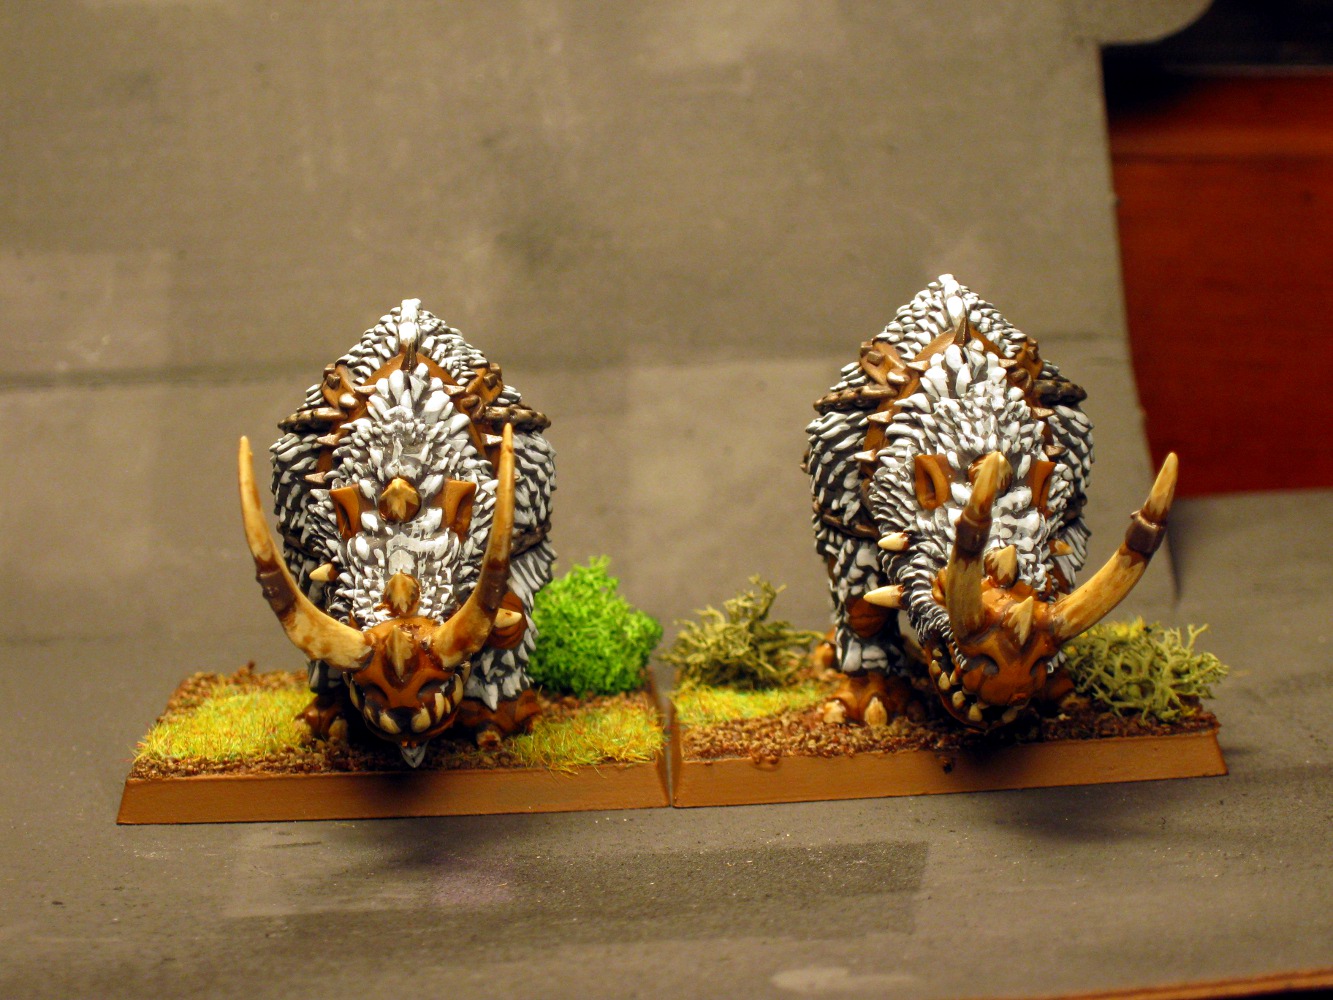
My buddy also wants to try out some razorgors, but the things are ghastly expensive.  Enter the pretty cool looking Ogre Kingdom thundertusk models.  I like these and they are fairly easy to make look good.  It just takes a while to paint each tuft of fur individually.....
Double Trouble.
I used Gryphonne Sepia wash on all of the bone materials and it really yielded a nice look.  The same goes for the two big guys.
I paint the fur on these guys very similarly to how I painted the wings on my Sanguinary Guard models.  It just looks really striking in person.  I love it.

That updates this particular round of commission work.  My next job is a smattering of everything; Hell Dorado, Malifaux, Gamezone, and Warmaster.

I'll be sure to show those models off as soon as they are done as some of them look really, really cool.

Other cool commissions I have been able to do:
____________________________________________________
Did you find this article useful?  Subscribe to Gone to Ground to get updates as new articles become available.

Friday, January 6, 2012

Painting Theory, Why Layering Works

I'm really trying to maintain momentum this year in regards to blogging.  I really love writing and I love wargaming, so what's not to like?  Well, coming up with daily or even bi-daily articles can be tough for one person.  I envy some of the larger blogs out there who manage to maintain a cadre of writers.  That would be awesome. 

So, if you like what I write about ( 40k, WFB, Warmachine, Painting and Modelling) and would like to try out an article, please feel free to go to my profile on the right and email me and let me know.  I would love to see some of the super cool ideas floating around out there just waiting to be published. 

Advertisement aside, I wanted to wrap up the week with a discussion (meaning I would love some feedback and comments) about painting and more specifically layering.

It occurred to me that in my previous article about painting a New Army in the New Year part of the reason some gamers don't get motivated to paint their armies is because they don't know how to make their army look "good".  There are tons of techniques out there, but I wanted to highlight the practice of layering today because of its ease of application.  Hopefully, this article will inspire some new or fearful hobbyists to try to develop their painting skills. 

But before I start talking about the actual practice of layering, I want you to do an experiment.  It requires a flat screen LCD TV and a second or two of your time.  If you don't have an LCD/LED/flat screen TV, why didn't you get one on Black Friday or Cyber Monday?!

Turn on the TV and move right in front of it, almost with your nose to the screen.  No, this isn't a prank.  What happens?  Chances are, your screen looks really pixel-y.  If you could zoom in super close, it looks something like this:

Now, step back 8-10 steps and take a look at it.  Notice the beautiful image on your screen.
Ahh!  Beautiful isn't it. 

So basically, these types of TVs work by containing LEDs that show either blue, red, or green (newer models are also showing white).  When each fires off correctly at a super small scale, they produce beautiful images.  The faster your TV screen refreshes these colors, the better the picture looks.

Well layering is a method of painting that achieves this type of effect though not nearly to the detail of a hi-res flat screen.

You see, your eye processes those separate colors and attempts to mesh them together to create smooth transitions the further you are from the source of the color.    This also explains why camoflauge works with both humans and animals.  That is also why you can go to a tournament and see a beautifully painted tournament army on the table top, but when you look at it up close, you can see obvious distinctions between layers of color.  Our brain seeks to meld like colors together in a seamless fashion. 

That is why layering works.

Now, there are multiple ways to layer, but I prefer one specific technique.  That is, to start with a shade color, work up to our base color, and finally adding a highlight color.  This takes on variation as many times I add intermediate steps, but it always follows this particular scheme. 

Some painters advocate starting with the base color then going back to add shading and finally a highlight.  I find it simpler to just start with the shade and work my way up. 

In most cases, this can be as easy as getting three different shades of the same color.  For instance, I like to do most of my blues with a dark blue like GW foundation mordian blue, followed by a medium blue like GW enchanted blue, and finally with a highlight like GW ice blue.  Again, you can add in intermediate steps by mixing these colors together or simply finding shades that go in between.

While using shades of a different color is convenient, you can also get really creative by adding different colors to the mix.  For instance, a great way to shade a blue hue is to start with a dark purple, then go to medium blue, followed by a lighter blue highlight.  This yields a very rich color in the end.  I often see this done with yellows as it is easier to start with a shade of red or orange and work up to yellow.  I also do this with white using various shades based on the overall effect I want to accomplish.  For instance, I like to use a shade of brown when I want a dirtier, worn white.  When I want a bright, clean white, I use a shade of blue first.  This yields some remarkable effects. 

Another useful tool for creating some great shading is the use of washing.  GW's washes are great, but you can make a wash out of any paint simply by watering it down until it's translucent. 

To apply the layering strategy, simply apply your first color.  After that, apply your next color, but leave a border of color from the last step visible.  I always apply lighter shades of paint where light would hit the surface in a more pronounced manner and in a progressively smaller area towards the direction of the light.  Repeat this until all layers of paint are complete.

When you are finished layer, what you get is a model that looks great on the tabletop and will appear to be seamlessly painted.

Here are a couple of examples taken from my efforts to paint my new Warmachine forces. 


Here I have my two warcasters High Exemplar Kreoss (pKreoss) and Grand Scrutator Severius (pSeverius).  Each is rife with layering.  Notice especially the reds and whites on the models.  The white was done starting with GW foundation Khemri brown, highlighting with Reaper Master Series Aged Bone, and finally Reaper Master Series Polished Bone.  The reds were done with Reaper Master Series Deep Red followed, I think, by GW Gore Red, and finally GW Blood Red.  In each case I applied a wash of GW Baal Red to the armor plating to further yield a smooth transition. 

That's it!  Layering, with practice, can make amazing looking models that will get you lots of positive attention on the tabletop. 

You might also find these articles of help:
Make Your Own GW Paints
Taking better pictures with cra...inexpensive equipment
Painting Halfway Decent Power Weapons
____________________________________________________________

Did you find this article useful? Subscribe to Gone to Ground for more great updates.

Friday, December 30, 2011

Holy Rusted Metal, Batman! A Rust Effect Tutorial

I have been working for a buddy of mine for awhile now, doing some commission work for him.  I am painting up a Warhammer Fantasy Beastman army for him.  I posted some of his larger monstrous creatures that I had painted quite a few months ago.  You can see them here in my post titled Large and in Charge. 

Anyway, when I started the commission originally, I wanted to paint the army so that it looked unique, not your typical clean paint job.  So, what gives Beastmen their character?  Their are basically devolved humans.  Thus, they probably don't put a lot of emphasis on cleanliness.  Aside from my friend's desire to have greyish skin, I thought it would be cool to have dirty Beastmen who also had rusty weapons and armor because they didn't take care of them like normal humans. 

After experimenting a bit, I decided on a fairly easy technique to achieve a pretty decent rust effect on metallic areas.  It uses a method of painting called stippling to apply the rust and then some controlled drybrushing to apply metal where the rust has been rubbed away.  Check out my pictures of a recently painted model who we will name Bob the Beastman. I apologize for the picture heavy nature of this email, but I hope they prove to be useful. 

Here is Bob, ready for paint.  He has been primed black which I honestly think is a good color when working on a dark, dirty model.
The first step to apply the rust effect is to take a dark metallic color, in this case GW Boltgun Metal, and drybrush it on all metallic areas of the model.  From this angle you can see quite a few different areas that required this initial step from chainmail to armor plates to the head of his axe. Don't worry to much about neatness as this layer will be virtually covered. 
After the first layer of metallic has been applied, we begin stippling on our rust colors.  Stippling requires a well used brush, one that you don't mind treating poorly.  To stipple, you need to apply paint to the brush in a similar manner to drybrushing.  Apply paint and then wipe off the majority of it.  Then, press the tip of the brush firmly and directly onto the surface you want.  Do this repeatedly to cover all areas.  Above, you can see the first layer of stippling that I have done.  I used GW Red Gore for this layer.
In this next picture, I have actually stippled on two more colors, GW Dark Flesh and Vermin Brown.  Rust isn't every only red.  It is generally a mixture of reddish and brownish hues, though I have seen models with green as well.  For this model, I have used red, brown, and orange hues.  Together these create quite a nice rust look.  Again, don't worry about neatness too much.  Stippling isn't neat, so this portion of the model should always occur first.  This also means that you need to be careful when painting around the rusted areas later as it becomes very hard to paint over them if you mess up. 


There are four pictures above.  These show the application of the rubbed metal sections.  Basically, rust flakes off easily when rubbed and if it is rubbed enough "new" metal will show through as a result.  Thus, we want to take a light metallic hue and paint it on edges and high points of models.  An area that requires attention is the edge of the axe.  Obviously as it is used, the edge will show shinier metal from hacking at opponents.  Thus, it requires a bit of attention.  You can see it in the second and fourth pictures.  On armor plates, generally metallic paint is only applied to the edges, but some can be done on high points.  See third and fourth pictures for examples of this.  Finally, for chainmail there isn't too much of a strict procedure.  I generally look at the chainmail and imagine where blood, grime, and verdigris would gather.  That is where I paint the rust effects and then I apply the metallic, in this case GW Chainmail to other areas where grime hasn't built up. 
Finally, I have some pictures of Bob completed save his base.  The rusted metal effect really balances the blue-grey skintones.  My buddy also wanted red fabric in his army's paint scheme, so the hood/facemask accomplishes this. 
A side view.  His skin is done using GW foundation paints Fenris Grey and Astronomican Grey.  I mix the two for an intermediate hue.
The flayed skin is easily done using GW foundation Tallarn Flesh, followed by an Ogryn Flesh wash and finally Dwarf Flesh. 
A final side view. 

That's it!  Achieve a nice rust effect is fairly easy.  This model took me about 15-20 minutes to achieve the rust effect.  It is quick since you don't have to spend so much time painting carefully around areas.  The messiness of the process is kind of freeing! 

If you have any questions or comments, please let me know.  I hope you find this article useful as you seek to add a bit of extra detail to models in your army.

Other tutorials you might find useful:
Painting Halfway Decent Power Weapons
Tutorial: How-to Rock Bases on the Cheap
How to Paint White Part 1: Bright White
____________________________________________________________
Did you find this article useful? Subscribe to Gone to Ground for more great updates.

Saturday, July 23, 2011

Tales of a Ringer: A Case in Point

Courtesy of GW
A day or two ago I wrote a post about why we need edition updates and if there might be some better way of doing things.  You can see it here: Why On Earth Do We Need New Editions?

Well, I got to play my game as the ringer for my friend's tournament today. I only played one game as the wife wanted some help in the afternoon with the boy.  My friend obligingly let me play one game and had another ringer lined up for rounds 2 and 3. 

My instructions were to make a sub-optimal army that would be easier to win against.  Thus, I went down my check list of things that make a Dark Elf army nasty. 1) Unkillable Lord TM, 2) double hydras, 3) cauldron of blood, and 4) insane volumes of fire. Easy enough.  I decided to start out by taking no ward saves whatsoever on my characters.  Thus, I took a single level 4 with the darkstar cloak (+1 casting dice).  I then decided to forgo having a fighty lord as my general at all and instead took two slightly less fighty hero characters.  One had a S6 weapon and armor that got better the more he killed and the other had a S5 armor piercing whip and a 2+ armor save.  Nothing special.  Next, every army needs a BSB in 8th.  Let's take a BSB with naught but a bathrobe for protection, a Death Hag.  I gave her a sub-optimal setup with the hydra banner (+1 attack for the unit on the charge), touch of death (killing blow) and cry of war (on the turn I charge, you take a leadership test or lose a point of WS).  So, yeah my character selection is fairly blah, though I did take the obligatory level 4 and shadow lore as it is a good beater lore.  Here's the character setup.

Level 4- darkstar cloak
Master-crimson death, blood armor, seadragon cloak
Master-whip of agony, dragonhelm, heavy armor, seadragon cloak, shield
Death Hag BSB- hydra banner, touch of death, cry of war

Next I looked at core.  Well, I needed to limit my shooting, so instead of multiple units of shooty, I took a 40 man spear unit (dun, dun, dun, horde unit), two ten man crossbows units with musicians, and two dark rider units with crossbows.  This produced 60 shots and a fat unit of squishy elves to chop up. 

I skipped to the rare selections then and did exactly what I was supposed.  No double hydras.  So, I took a single hydra and two repeater bolt throwers which everyone says are crap now.  They are. 

Finally, I looked at my elite slots.  In order to make the army look dangerous but not actually be, I decided to sink a 5th of my total points into a unit of naked, screaming witches.  That's right, I took 21 witch elves with an assassin.  They had an armor piercing banner, the assassin had the venom sword (which I am told was a waste) and the hag had +D3 extra attacks.  In all, this unit usually folds like a wet tissue.

To round things out I took a 10 man squad of black guard with a banner and the ASF banner. 

So, sum total for my ringer army, I had:

Level 4- darkstar cloak
Master-crimson death, blood armor, seadragon cloak
Master-whip of agony, dragonhelm, heavy armor, seadragon cloak, shield
Death Hag BSB- hydra banner, touch of death, cry of war

40 spears- full command
10 crossbows- musician
5 dark riders- crossbows

21 witch elves- armor piercing banner, hag with rune of khaine, assassin with extra handweapon and venom sword.
10 black guard- standard, ASF banner

Hydra
2 bolt throwers

So, in all I had 1,000pts of my army with no save at all.  The best armor save besides my hydra and masters was a 5+.  What did I take that was good? A single hydra, a horde unit of spears, and shadow lore.  That's about all I needed. 

I, interestingly enough, played against an Orc and Goblin army with no casters.  It had a bit of everything.  Lord, BSB, warboss on boar, horde of gobbos, 18 black orcs, 18 savage orcs, 5 savage boar boyz, 3 trolls, 20ish orc boyz, 2 x 5 squig hoppers, 4 bolt throwers, 2 giants, 2 mangler squigs. So, what's a ringer army supposed to do when his opponent is less optimal than he is?

The tournament used some of the BRB's scenarios and we played Blood and Glory which created a system where you had a Break point (equal to 1 point for each 1,000pt. of army rounding up) and Fortitude points ( 1 for banners and BSBs, and 2 for general)  When your fortitude number reached the same number as your break point you lost, no matter what.  So basically, when your fortitude number reached 3, you lost.  My opponent and I both had 8 fortitude points, so I needed to kill/capture 5 points worth of generals and standards. 

The game ended in turn 3 when his general, bsb and 18 man black orc unit charged my witch elf unit.  My assassin challenged and drew the BSB, who he subsequently slipped one wound through and killed via the venom sword.  Then my Death Hag put all of her attacks on the general garnering one killing blow.  Finally, the witches killed some 8 or 9 black orcs due to poison, armor piercing and just plain rolling tons of attacks.  In the end, the unit fled only dealing about 5 wounds to my witches.  We decided to keep playing as if it were a normal victory points mission.  In the end, the unit that worked for me the best was the horde spears with level 4 using okkham's mindrazor (use leadership value for strength).  I even threw units forward carelessly at the midgame point just to create some fun for my opponent.  In the end, I came out with a win in victory points as well.  A big thing that helped garner the victory here was no shooting to speak of.  My witches die in droves to shooting, but they were never shot until the end when my opponent got a nice flank shot with two of his bolt throwers that killed about 6 witches. 

So, looking at this from a whole game perspective and not just the scenario, the thing that won me the game was the level 4 with buffed spears in a horde formation.  Which happens to be the perceived successful build for most units in the Fantasy these days.

I failed miserably as a ringer.

____________________________________________________________

Did you find this article useful? Subscribe to Gone to Ground for more great updates.

Sunday, April 24, 2011

Large And In Charge

I have an ongoing commission job with a friend painting his WFB Beastman army.  The cool thing about this friend is that he doesn't mind going outside of GW's model range for his models.  Because of this, I was able to paint two very cool models that were sculpted by independent groups (i.e. non-GW).  The first will serve as his Chaos Giant and man this thing huge.  Check out the first picture that has a space marine standing in front to give an idea of scale. 

They grow 'em big where this guy comes from.

You can see a few details of the basing here.  On the front, there is a horse skeleton laying partially covered by the rock.  You can see it in the first picture. 

This model will serve as one of the plethora of other monstrous creatures that Beastmen can bring, but that don't have an official model.  The big issue with this guy was his fur.  He is covered in fur and the fur is very fine grained, if that makes sense.  Thus, it made painting individual swathes of fur next to impossible.  Thus, I did some layered drybrushing that involved using overhead light sourcing to lighten the fur to make it look a bit nicer than a single drybrush over a basecoat would look. 
I painted the mane red highlighting up to orange to match the loin cloth and break up the gray fur.  Ultimately this guy is a snazzy model and was pretty fun to paint. 

So, while not exactly 40k, that is what I have been up to for the past couple of weeks in regards to the hobby.  The Blood Angel Sanguinary list is still being collected.  I hope to convert, to some extent, every model, so am still ebaying and rummaging through bartertown for pieces. 

I hope you liked the pictures.  Watch for the next installment of the Black Templar Codex Review, coming soon. 

Monday, April 11, 2011

Post-Event Paint Judging Thoughts

I finished paint judging at about 8:15a.m. yesterday morning and got to witness the successful completion of the 9th annual Lonewolf GT.  It was a great time and I learned a few things about painting along the way as well. 

After judging around 85 armies in a 2 day period, I have come to realize that there are some definite steps a player can take to make their army stand out for those player's choice and best painted awards.  If you don't feel you are up to that high standard, these tips will also help improve your soft scores in a tournament.

Dave's 5 tips for scoring well in the painting category.

1) Paint your entire army!!  Out of about 85 armies, somewhere in the neighborhood of 25% weren't fully painted.  This is huge.  Don't procrastinate in getting your army painted.

2) Base your army consistently! Don't leave bases unfinished.  Then, don't have several different basing schemes.  Keep the army look consistent.  After all, your entire army is fighting on the same battlefield.  Their bases should look the same. 

3) Layer- The differences between a fully drybrushed army and an army with even two layers of paint is huge.  Drybrushing gives off a very chalky, messy look and while it is nice for quickly painting chainmail or fur, it shouldn't be used army wide.  Yes it is fast, but it won't get you as many points.  Simply laying down a base coat, a layer of wash, and then a second highlight layer looks far better (though I advocate several layers).  Simply doing this should pip above the vast majority of armies. Check out the From the Warp painting archive for some great articles on how to make your army pop. 

4) Remember the details- Pic out the various trophies, gems, EYES, etc. in your army. Don't pass over them.  Picking out these small portions of the model really helps and makes them pop.  If you don't want to spend the time to do that on every model, pick out a few key models, do them well and place them prominently when being judged.

5) Get a display board-  Not a cafeteria tray or even a tv tray.  Those work for keeping the army together and for easy transport, but they aren't a DISPLAY board.  A display board is meant to help model the army in a dynamic way so that it looks cool.  Most of the time they include scenery  Base it just like your army is based and spend some time on it.  Display boards really set up many of the armies I judged for higher points.  If you want to go the extra mile, you can make a highly creative display board.  Some people include electronics in their boards!  Check out some of the boards below.

Following these tips can make a huge difference.  There are also a lot of other things you can do, but these small things can make quite a difference in your painting scores. 

As promised, here are some of the sweet(-er) armies from the tournament.


The above lizardmen army was designed around an army of albino lizards that live in a cliff dwelling. 

The above painted Ogre Kingdoms army was converted like crazy.  Almost every model had some sort of conversion from simple head/weapon swaps to full own kitbashed models.  The painting was also a cut above just about everyone in the room.

These two models were painted by the owner of the OK army.  They are superb examples of a well painted model.  Too bad I have shaky hands. 


The above army is a Warriors of Chaos army done totally as a Japanese Samurai army.  This was a really slick army.  You can see the detail that went into it in the battle standard bearer and oni warrior. 


This Dwarf army was really great as well.  The display board was perhaps one of the best.  It included lighting mounted into the board in the entrance of the keep and under an overhang.  The army was very well painted and highly converted.  I especially love the mortar firing goblins (counts as stone thrower) and unit fillers.

Each of these armies fulfilled (and in many cases surpassed) the tips included above.  Consequently, they are some of the highest scoring armies in the tournament.

____________________________________________________________

Did you find this article useful? Subscribe to Gone to Ground for more great updates.
Related Posts Plugin for WordPress, Blogger...